AKS Nodes
Use the nodes tab to monitor cluster nodes and track their activity. You can view details such as resource allocations, labels, and annotations for each node. Additionally, you can access information about the pods running on each node.
View Nodes in the Console
To access the nodes tab:
- Click Ocean > Cloud Clusters.
- Select a cluster.
- Click Nodes.
Click to view
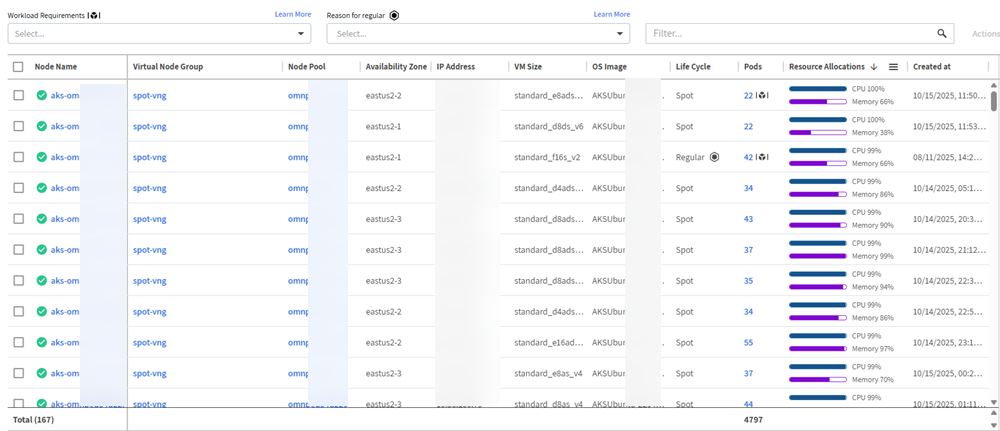
The nodes list contains these columns:
- Node Name, and status icon:
- Green: Running correctly.
- Orange: Warning. For example, when the node cannot be scheduled.
- Spinner: Node detach is in progress.
- Virtual Node Group: Click on the link to open the configuration for the virtual node group.
- Node Pool: Click on the link to open the configuration for the node pool.
- Availability Zone: Availability zone for the node pool (including region information).
- VM Size: Machine type.
- Lifecycle:
- Regular or spot.
 Icon with a tooltip that describes the reason why the node requires a regular lifecycle.
- Pods:
- Number of pods.
 Icon with a tooltip that describes the reason why one or more pods require a regular lifecycle (with number of affected pods).
- Resource Allocations: Allocated CPU and memory percentages.
- Created at: mm/dd/yyyy
See also Reasons for node or pod with regular lifecycle.
To see workload requirements, use the Workload requirements filter above the nodes list to search.
Reasons for Node or Pod with Regular Lifecycle
Use the Reason for regular filter above the nodes list to search.
If an ![]() icon appears in the lifecycle column for the node, hover over the icon to see the reason in a tooltip:
icon appears in the lifecycle column for the node, hover over the icon to see the reason in a tooltip:
- Risk (virtual node group spot %): The percentage of spot nodes configured in the virtual node group configuration impacts the percentage of regular nodes launched. Increase the risk setting to continue running spot nodes.
- Pods with missing spot tolerations: The node has pods without the required spot tolerations, preventing them from running on spot VMs. This means the node's pods cannot be scheduled on spot VMs. To address this issue, install the admission mutating webhook that injects the spot toleration, which AKS requires to run pods on spot nodes.
- From the Actions menu, select Spot Toleration Injection.
- Fallback to regular lifecycle: The node has fallen back to a regular lifecycle. This setting is configured in the virtual node group and lets Ocean launch regular VMs when spot markets are unavailable. When spots become available, regular nodes are reverted to spot nodes.
- Revert to commitment: Nodes may be launched as spots or regulars due to unavailable commitments (RI or SP). Ocean continuously scans the market for available commitments. When it finds them, it reverts the spots/regulars to commitments.
If an ![]() icon appears in the Pods column for a node in the nodes list, the node has one or more pods that require a regular lifecycle. These pods may have specific requirements or dependencies that make them incompatible with spot VMs.
Hover over the icon to see the reason(s) in a tooltip:
icon appears in the Pods column for a node in the nodes list, the node has one or more pods that require a regular lifecycle. These pods may have specific requirements or dependencies that make them incompatible with spot VMs.
Hover over the icon to see the reason(s) in a tooltip:
- Pod Disruption Budget (PDB): If any pods have a PDB and the PDB option is enabled, Ocean verifies the PDB and will not migrate a node if the PDB would be violated.
- Required VM type: The pod requires a specific VM type.
- Restrict scale-down label: Rolls do not consider the restrict scale-down label. Ocean will migrate a node even if a task or pod uses this label. Ocean's autoscaler considers all configured constraints before the roll.
- Required availability zone: The pod requires a specific availability zone.
Roll Nodes
To start an immediate node roll:
- Select one or more nodes to roll in the nodes list by clicking checkboxes on the left.
- Select Node roll from the Actions menu above the nodes list, top-right.
Click to view
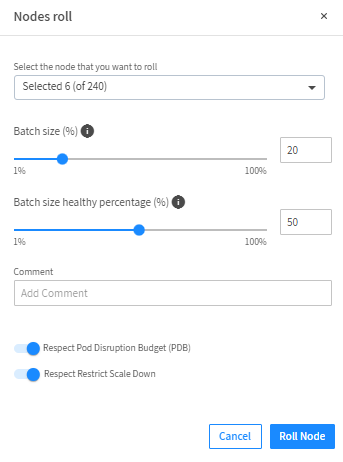
You can optionally click on the down arrow to change your selection or Select all to roll all the nodes in the list.
- Configure the Roll Parameters
- Set the size of a roll batch (%).
- Set the batch size healthy percentage (%).
- Add an optional comment.
- Turn on or turn off Respect Pod Disruption Budget (PDB).
- Turn on or turn off Respect Restrict Scale Down.
- Click Roll node. The roll process opens in the Rolls tab. When the roll is complete, it appears in the Rolls History list.
Terminate VMs
- Select one or more nodes to terminate in the nodes list by clicking checkboxes on the left.
- Select Terminate VMs from the Actions menu above the nodes list, top-right.
- Type Terminate in the dialog box that opens.
- Click Terminate to confirm the action.
VM termination may take several minutes to complete.